Learning by building
I enjoy learning a technology by making it do something real. That is what brought me to combine infrastructure provisioning with configuration management: one tool creates the machines and network, and another describes how those machines should be configured.
I put together an informal, voluntary knowledge-sharing session with colleagues around that idea. It was a peer-to-peer learning initiative, not an official company training program. The aim was to explore the tools together, try a practical lab, and make automation feel approachable—even if you do not think of yourself as a programmer.
The presentation’s objective was to gain hands-on experience provisioning AWS infrastructure with Terraform and managing configurations with Puppet, with GitHub as the source control repository. Both the Terraform lab and Puppet control repository are now public, so this walkthrough can link to the code behind each part.
What are we building?
The public example provisions a small lab in AWS: a dedicated VPC, a public subnet and the networking needed for access, plus two Rocky Linux 9 EC2 instances. One is prepared as a Puppet Server; the other gets a Puppet Agent. First-boot scripts install and configure those components.
Each tool has a different responsibility:
- GitHub stores version-controlled infrastructure and configuration code. Both the Terraform example and Puppet control repository are public.
- Terraform reads the infrastructure code and creates or removes the AWS resources described by it.
- AWS EC2 runs the Linux machines, while the VPC and related network resources let the lab components communicate.
- Puppet Server compiles configuration into a catalog for a managed node.
- Puppet Agent requests its catalog and applies the desired configuration on its host.
The Terraform repository confirms the two-host topology and installs Puppet during first boot. The public control repository supplies the manifests, reusable classes, and Hiera data that describe the server configuration.
Architecture
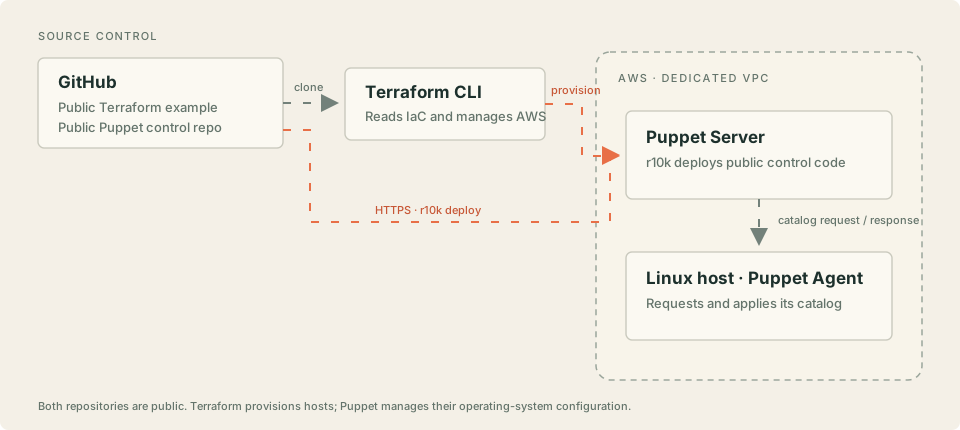
The public Terraform code sets up the server-to-agent network path for Puppet. During first boot, r10k clones the public control repository over HTTPS and deploys its production branch as the production environment. No GitHub SSH key or repository authorization is required for this public clone.
Before you begin
- An AWS account and CLI or SDK credentials with permission to create the resources in the example.
- Terraform 1.5 or later and the AWS CLI.
- A terminal on Linux, macOS, or Windows for Git, Terraform, and AWS CLI. The workshop recommended Ubuntu or Fedora, and the lab hosts themselves run Rocky Linux 9.
- Git and the public Terraform repository ↗ and Puppet control repository ↗.
- A dedicated SSH key pair at
~/.ssh/puppet-laband~/.ssh/puppet-lab.pub, as required by the public example.
- Create an AWS account ↗
- Install Git ↗ — includes Linux package-manager guidance.
- Install or update AWS CLI v2 ↗, then follow the AWS CLI authentication guide ↗.
- Install Terraform ↗; this repository requires version 1.5 or later. See the AWS provider authentication guide ↗ for how Terraform obtains AWS credentials.
- A dedicated SSH key pair for the Terraform example. AWS documents the key types supported by EC2 ↗. Windows users need the OpenSSH Client; see Microsoft’s install guide ↗.
Create the key files at the paths the Terraform configuration reads. These commands create an Ed25519 key pair for the Linux hosts:
mkdir -p ~/.ssh
chmod 700 ~/.ssh
ssh-keygen -t ed25519 -f ~/.ssh/puppet-lab -C "puppet-lab"New-Item -ItemType Directory -Force "$HOME\.ssh" | Out-Null
ssh-keygen -t ed25519 -f "$HOME\.ssh\puppet-lab" -C "puppet-lab"When prompted, choose a passphrase according to your SSH workflow. The commands write the private key to ~/.ssh/puppet-lab (or $HOME\.ssh\puppet-lab on Windows) and the public key to the same name with .pub appended. Keep the private key secret and outside Git. If either file already exists, don’t overwrite a key you still need.
The Terraform example uses local state in its working directory. Protect that state and do not commit it; Terraform state can contain sensitive infrastructure data.
Provision infrastructure with Terraform
Open the public Terraform repository ↗. Its puppet/ example declares the provider and lab resources. The README specifies Terraform 1.5 or newer, AWS credentials, and the SSH key pair above.
From a clone of the repository, use the documented example directory. These setup and validation commands are listed by the repository:
cd cloud-engineering-lab/puppet
terraform init
terraform fmt -check
terraform validate
terraform plan -var='ssh_cidr=YOUR_PUBLIC_IP/32' -var='aws_region=ap-south-1'
Replace YOUR_PUBLIC_IP/32 with the CIDR for an address you trust for SSH. The public example’s default is open to all IPv4 sources, so explicitly narrow it before planning and applying. Keep the same region and CIDR variables in both commands.
terraform initinitializes this directory and installs the provider.terraform fmt -checkchecks Terraform formatting without changing files.terraform validatechecks configuration syntax and internal consistency.terraform planpreviews the changes against the configured AWS account. Review resource creation and network exposure before continuing.
When the plan is what you expect, apply it:
terraform apply -var='ssh_cidr=YOUR_PUBLIC_IP/32' -var='aws_region=ap-south-1'Terraform will ask you to confirm before it performs the proposed changes. The committed public configuration currently selects Rocky Linux 9, a t3.small Puppet Server and a t3.micro agent, and defaults the region to ap-south-1. These are configuration choices, not a claim that this page has deployed or tested the lab. Check the repository and your plan in case the example changes.
Pause the lab when you’re not using it
To reduce compute charges between sessions, change to the cloud-engineering-lab/puppet directory and use the repository’s manage-instances.sh helper ↗. Run this to stop the lab instances:
./manage-instances.sh stopWhen you’re ready to use the lab again, run:
./manage-instances.sh startThe script finds instances tagged Environment=puppet-lab, stops running instances or starts stopped ones, and waits for the state change. It defaults to ap-south-1; pass --region REGION or set AWS_REGION to use another region. Stopping avoids EC2 compute charges while the instances are stopped, but retained EBS volumes, Elastic IPs, and other resources can still cost money. This pauses the instances; it does not delete the lab resources.
Terraform’s typical lifecycle commands are init, plan, apply, and—after review—destroy. Learn more in the Terraform CLI documentation ↗.
Understand Puppet
Puppet is a configuration management system. Its language describes resources and the state they should have; Puppet Server turns the applicable manifests and node information into a catalog for each managed machine.
- Puppet Server
- Receives agent requests and compiles the configuration catalog for a node.
- Puppet Agent
- Runs on a managed host, requests its catalog, checks resources, and applies needed changes.
- Manifest
- A Puppet-language file containing declarations that describe resources and desired configuration.
- Catalog
- The compiled, node-specific set of resources and relationships the agent should manage.
- Desired state
- The declared condition a managed resource should reach, such as a package being present or a service running.
This model makes it possible to keep configuration consistent across multiple machines and to correct drift on later Puppet runs. Common uses include managing packages and services, users and groups, application configuration, and security settings. See the Puppet architecture guide ↗ and language overview ↗.
Configure the servers with Puppet
The public Terraform example installs Puppet Server and Agent, configures the client’s server connection, and includes an initial agent run. On first boot, the server deploys the production environment from the public control repository. To pull later changes, run the README’s deployment command on the Puppet Server:
r10k deploy environment production -v info
/opt/puppetlabs/bin/puppet config print environment
/opt/puppetlabs/bin/puppet config print codedir
Then, from a shell on the client, the documented command requests and applies its catalog:
sudo /opt/puppetlabs/bin/puppet agent --testThe current control repository classifies every node with linux_baseline. It installs the package list in data/common.yaml, creates a nikunj user and group, grants that user passwordless full sudo, and creates /opt/nikunjmaster. The configured client certname also receives the webserver class, which installs and enables Apache’s httpd service. Hiera checks per-node data before the common data.
The control repository is explicitly for learning and warns against production use. In particular, its baseline grants passwordless full sudo to the nikunj account. Read the repository README ↗ and review the manifests before applying this configuration to any system.
Explore the source directly: manifests/site.pp ↗, linux_baseline ↗, and webserver ↗.
Verify the lab
Use observable checks at each layer; do not assume that starting Terraform means the Puppet policy is applied:
- After applying, inspect the Terraform output values and the AWS console to confirm the expected resources exist in the intended account and region. The public README documents
terraform output. - Check first-boot progress on the hosts using the cloud-init output log command shown in the public README:
sudo tail -f /var/log/cloud-init-output.log. - On the Puppet Server, inspect the environment and code directory with the two
puppet config printcommands above. - On the client, run
puppet agent --testas documented. Review its output for catalog retrieval and resource application or reported errors. - Compare the client with the public manifest: it should receive the shared Linux baseline, and the configured client node should also receive the Apache webserver class.
I have not run this lab as part of preparing this article, so these are verification steps rather than a report of successful execution.
Ansible versus Puppet
The workshop used this comparison to introduce two different automation models. Both tools can support a range of workflows; the right fit depends on your environment and operating practices.
| Idea | Puppet | Ansible |
|---|---|---|
| Typical model | Agent and server; agents request catalogs. | Often agentless; a control node connects to managed hosts, commonly over SSH or WinRM. |
| Configuration language | Puppet DSL, commonly declarative resource descriptions. | YAML playbooks describe plays and tasks. |
| How changes run | Agents can run periodically and reconcile declared state. | Playbooks are generally run on demand or through scheduled/automated workflows. |
| Useful framing | Describe the intended state and let runs reconcile managed resources. | Describe an ordered set of automation tasks to execute. |
That is a conceptual comparison, not a rule about scale or quality. Ansible can be scheduled and can manage stateful resources; Puppet can also be run explicitly. Choose based on the needs of the systems and the team. Continue with Ansible’s playbook introduction ↗.
Troubleshooting and lessons
No specific workshop failure is recorded in the presentation, so these are general checks suggested by the documented architecture—not incidents from the session.
- Plan shows unexpected exposure or resources: stop and review the selected AWS account, region, Terraform directory, variables, and plan. Set a trusted SSH CIDR explicitly.
- First boot is still running: the public README recommends checking
/var/log/cloud-init-output.logafter connecting to the instance. Allow first-boot package installation time. - Agent cannot contact the server: check that both hosts were created, the server is reachable on the Puppet port from the client security group, and the client is pointed at the intended server.
- r10k cannot deploy the control repository: confirm the server can reach GitHub over HTTPS, check the
github_usernameandgithub_puppet_control_repositoryTerraform variables, and confirm the deployed branch matches the Puppet environment name. The public repository does not require a GitHub SSH key. - Agent contacts the server but gets no usable catalog: verify the environment was deployed and ask the control-repo maintainer to check node classification and catalog errors.
For certificate or identity questions, follow Puppet’s security guidance and verify the lab’s own authorization policy before signing or trusting a node.
Clean up AWS resources
Before running a destroy command, verify the exact Terraform working directory (cloud-engineering-lab/puppet), selected workspace, AWS account and region, state file, and resource scope. Inspect the destroy plan and confirm that it contains only resources you intend to remove.
From the same Terraform example directory and with the same variable values, generate and review a destroy plan:
terraform plan -destroy -var='ssh_cidr=YOUR_PUBLIC_IP/32' -var='aws_region=ap-south-1'
terraform destroy -var='ssh_cidr=YOUR_PUBLIC_IP/32' -var='aws_region=ap-south-1'
Terraform will ask for confirmation when you run destroy. Read the proposed removals before confirming. The example’s resources can include allocated public IPv4 addresses, which may continue to incur charges until released. Anything created outside this Terraform state—or retained through another AWS service—may need separate cleanup. Check AWS after the operation and review billing for lingering resources.
A final thought
This session was one way for me to learn in public with colleagues: build something small, understand how the pieces fit, and share what I discover. Automation is not an end in itself. It can give us a way to spend less time repeating routine work and more time solving the interesting problems.
You don’t need to become programmers.
You just need to automate boredom.
Related reading
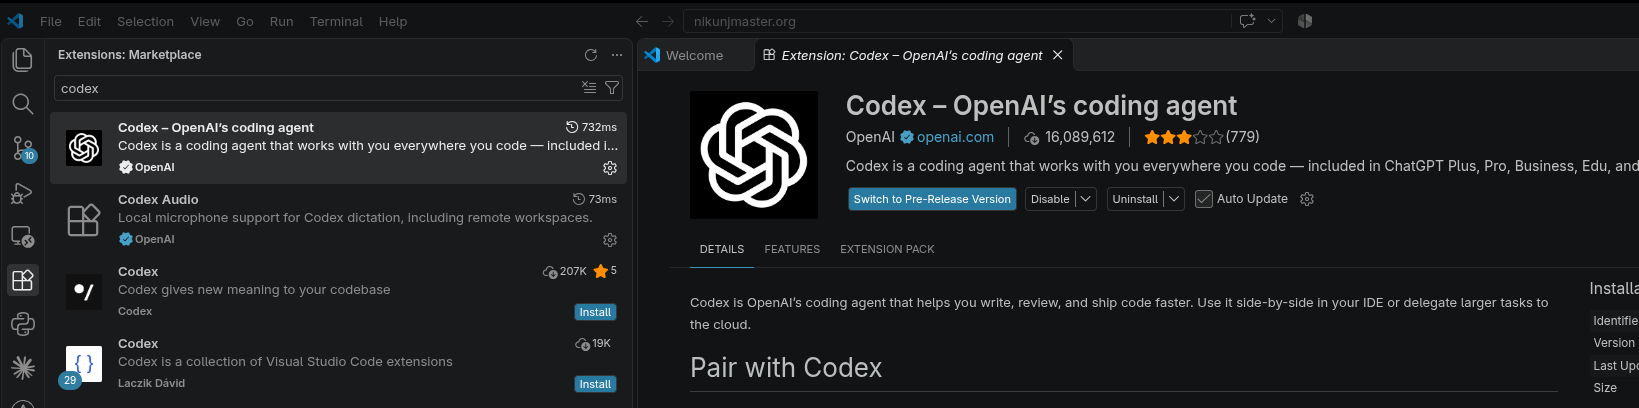
I developed the Terraform code for this lab using a pair-programming approach. If you’d like to try the same approach with OpenAI Codex, start with this guide:
Continue learning about Puppet
Use Git to manage infrastructure changes